How to setup and install Solidworks PDM using Microsoft Intune

Deploying SolidWorks PDM via Intune
Deploying SolidWorks PDM can be complex and often fails when installers are incomplete or vault mapping lacks permission. The goal here is a repeatable, automated Intune deployment for SolidWorks PDM and eDrawings that includes automatic vault mapping. SolidWorks provides tools to simplify this, and this guide describes preparing an administrative image, creating a vault-view configuration (.cvs), packaging everything with the Win32 Content Prep Tool, and configuring the app in Intune.
Prerequisites
- Microsoft Intune admin access
- SolidWorks PDM installation files (MSI or EXE)
- Required license information
- WIN32 Content Preparation Tool
Steps
Creating an administrative image lets you deploy the client consistently across machines.
Create the SolidWorks administrative image
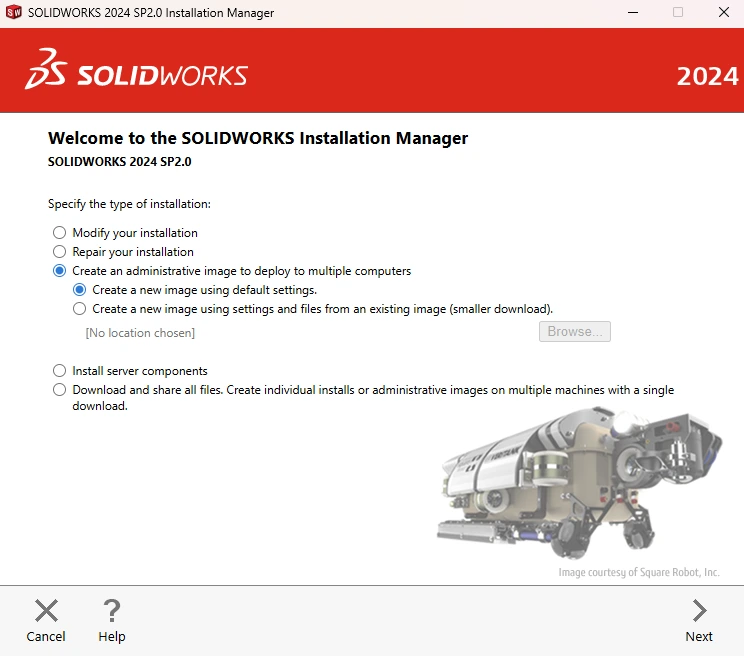
- Run the SolidWorks full setup.exe and choose Create an administrative image. Use “Create a new image using default settings” if you plan to modify later.
- If you plan to create administrative images for other SolidWorks products, choose “Download and share all files…” to reuse a single download.
- Skip the first product key screen if you’re only creating the PDM client image and click OK on the warning.
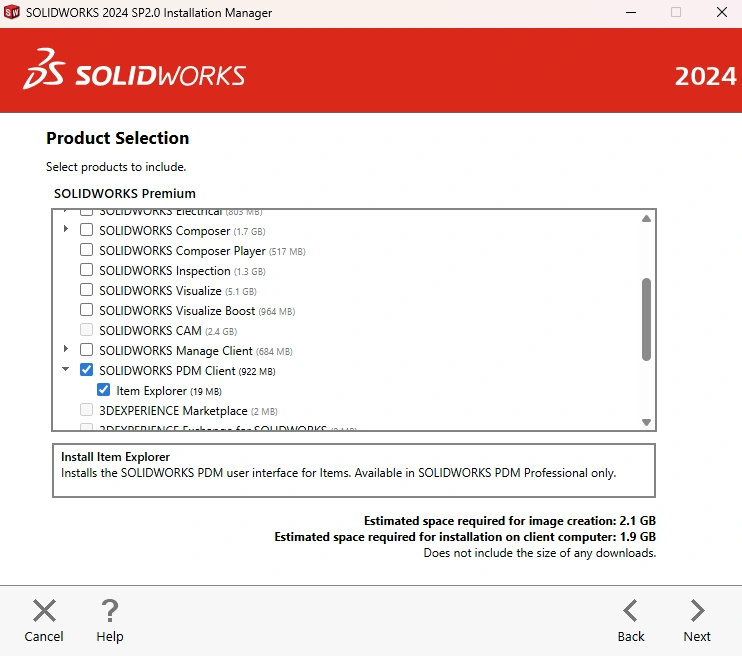
- Select components for the administrative image (e.g., SolidWorks PDM Client, Item Explorer, eDrawings) and continue.
- Choose a local location for your administrative image (defaults are fine). I place mine in my Win32 content prep source folder: C:\WIN32\source
Local Vault View
To map vaults automatically during installation, create a .cvs file using the ViewSetup utility included with SolidWorks PDM. This file configures the local vault view so users get their vault mapped without manual steps.
What is a local vault view?
A local vault view is the user interface on a workstation that connects to a SOLIDWORKS PDM vault. It lets users check files in/out, progress workflow states, and perform other vault activities.
Creating a local Vault View
Run the View Setup Wizard on a machine with SolidWorks PDM installed and no existing local view for the target vault. The person running it needs the PDM server name and Attach access. For large rollouts you can generate a .cvs to automate this for end users.
Creating the .cvs file
Run ViewSetup.exe with the /a switch on a machine with PDM installed. Common locations:
1
2
C:\Program Files\SOLIDWORKS Corp\SOLIDWORKS PDM\ViewSetup.exe
C:\Program Files\SOLIDWORKS XXXX\SOLIDWORKS PDM\ViewSetup.exe
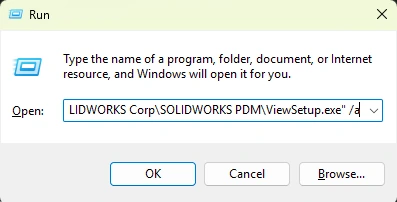
Open Run and execute:
1
"C:\Program Files\SOLIDWORKS Corp\SOLIDWORKS PDM\ViewSetup.exe" /a
- Follow the prompts to create the view, select the vault, and set the local path.
- Choose “for all users on this computer” when prompted.
- After completion, locate the produced prodvault.cvs (name may vary by vault) in the chosen path. This file contains the configuration to recreate the vault view.
Copy the .cvs to your Win32 Content Prep source folder alongside the administrative image. Package both with a script that runs the installer and then the .cvs to map the vault.
The .bat file
Use a simple .bat script to run the installer silently and then execute the .cvs with ViewSetup. Example:
1
2
3
4
5
6
7
8
9
10
11
12
13
14
15
16
17
18
19
20
21
22
23
24
25
26
27
28
29
30
31
32
33
34
35
36
37
38
39
40
41
42
43
44
@echo off
setlocal

REM Define working directory
set "CVS_DIR=C:\SW_CVS"

REM Create the directory if it doesn't exist
if not exist "%CVS_DIR%" mkdir "%CVS_DIR%"

REM Start SolidWorks installer and wait for it to finish
echo Starting SolidWorks installation...
start /wait "" "%~dp0startswinstall.exe"

IF ERRORLEVEL 1 (
    echo SolidWorks installation failed or exited with error.
    exit /b 1
)

REM Copy prodvault.cvs to C:\SW_CVS
echo Copying prodvault.cvs to %CVS_DIR%...
copy "%~dp0prodvault.cvs" "%CVS_DIR%\prodvault.cvs" >nul

REM Check if copy was successful
if not exist "%CVS_DIR%\prodvault.cvs" (
    echo Failed to copy prodvault.cvs
    exit /b 1
)

REM Run ViewSetup with the .cvs file
echo Running ViewSetup with prodvault.cvs...
"%ProgramFiles%\SOLIDWORKS Corp\SOLIDWORKS PDM\ViewSetup.exe" "%CVS_DIR%\prodvault.cvs"

REM Optional: short pause to ensure process launches
timeout /t 5 /nobreak >nul

REM Clean up
echo Cleaning up...
del "%CVS_DIR%\prodvault.cvs" >nul
rmdir "%CVS_DIR%" >nul

echo Done.
endlocal
exit /b 0
This script:
- Runs the SolidWorks administrative installation
- Copies the prodvault.cvs into a known location
- Starts ViewSetup.exe with the .cvs to create the local view
- Cleans up temporary files
Win32 Prep
The Win32 Content Prep Tool packages a Win32 app and supporting files into a single .intunewin archive for Intune. It preserves folder structure and compresses everything for upload.
Packaging the Win32 App
- Launch the Win32 Content Prep Tool.
- Set the source folder to the directory containing the administrative image, prodvault.cvs, and the .bat script (example: “C:\WIN32\source\SOLIDWORKS 2024 SP2”).
- Set the setup file to your .bat script (example: “C:\WIN32\source\SOLIDWORKS 2024 SP2\install.bat”).
- Choose an output folder (example: “C:\WIN32\output”).
- Do not specify a catalog folder.
After the tool finishes, you will have a .intunewin file in the output folder ready for upload to Intune.
Configuring the administrative image in Intune
- Sign in to the Intune admin center.
- Go to Apps > Windows > Create and choose Windows App (Win32).
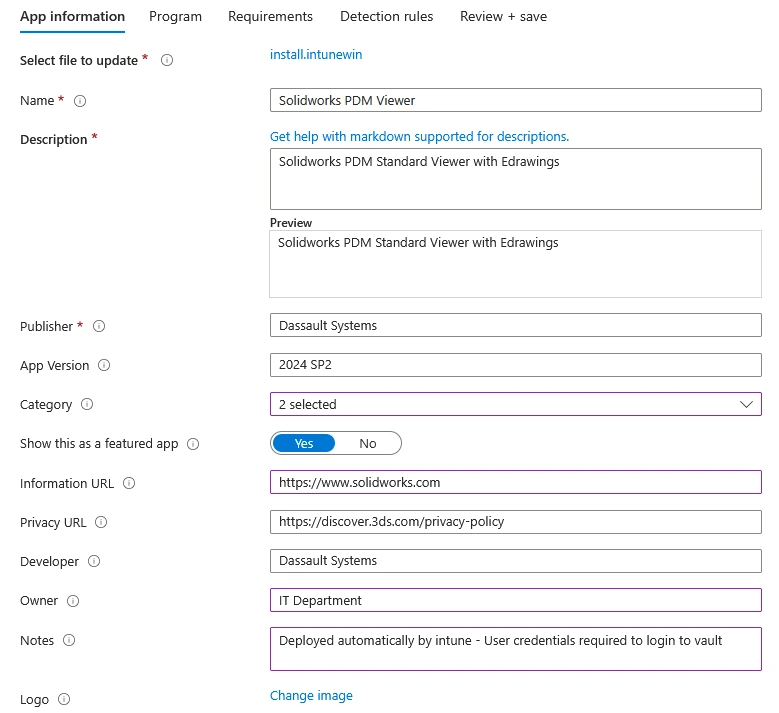
- Upload the .intunewin and complete the app information:
- Name: Solidworks PDM Viewer
- Description: Solidworks PDM Standard Viewer with eDrawings
- Publisher: Dassault Systems
- App Version: 2024 SP2
- Category: Business, Data Management
- Information URL: https://www.solidworks.com/
- Developer: Dassault Systems
- Owner: IT Department
- Upload a logo if desired
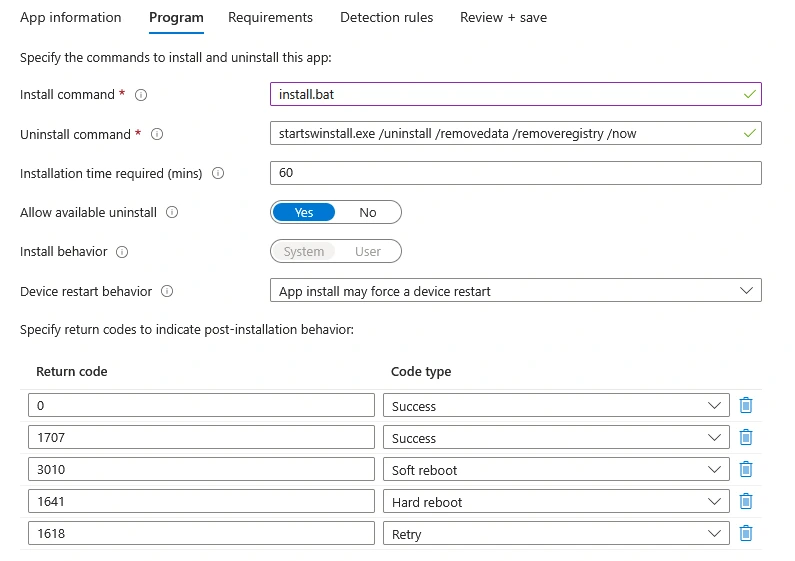
Configure Program Settings
- Install command: the packaged .bat file (e.g., install.bat).
- Uninstall command: if needed, for example startswinstall.exe /uninstall /removedata /removeregistry /now (verify and test this before using in production).
- Set correct return codes for successful installation.
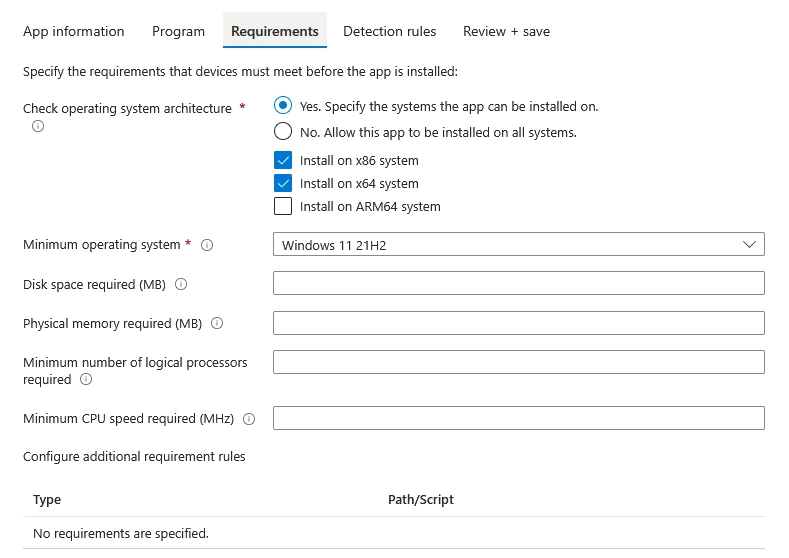
Requirements
- Target x86 and x64 systems as needed.
- Minimum OS: Windows 10 21H2 and later (adjust based on your environment).
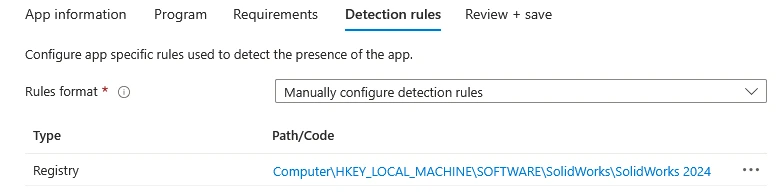
Detection Rules
- Configure manual detection rules.
- Example using registry key detection for the SolidWorks PDM client:
- Rule Type: Registry
- Key Path: Computer\HKEY_LOCAL_MACHINE\SOFTWARE\SolidWorks\SolidWorks 2024
- Value name: (leave blank)
- Detection Method: Key Exists
- Associated with a 64-bit app on 64-bit clients: No
Finalize and Assign
- Review the configuration and create the app.
- Assign the app to appropriate user or device groups. For initial testing you might set it to available for all, then scope down for production.
Consclusion
I hope this guide helps you deploy SolidWorks PDM via Intune successfully. Automating the installation and vault mapping process reduces manual effort and ensures consistency across deployments. Always test thoroughly in a controlled environment before rolling out to production. I am rather proud of this one! I remember struggling with PDM installs years ago and this method makes it so much easier.
Resources
- Microsoft Intune Documentation: https://docs.microsoft.com/intune/
- SolidWorks PDM Installation Guide: https://help.solidworks.com/